Discover a new unique nail polish color by making one at home with a simple recipe. Read the article to know how to make homemade nail polish and let your fingernails stand out from others.
How To Make Nail Polish
Coloring nails has been a beauty statement ever since the ancient Egyptians started using henna to color their hair and nails. Today, nail polish has become an indispensable part of the fashion etiquette. Though available in thousands of different shades and colors, it might happen that you just do not get the shade that you are actually looking out for. In such circumstances, the best alternative would be to get a shade of your choice, by getting crafty and creative and making your own nail polish at home. Sounds strange, but the resulting color can surely help you get your own shade and color. Homemade nail polish is not only safe, but also gives you brilliant, beautiful and shiny fingernails. Learn how to make nail polish at home by following any of the following recipes. 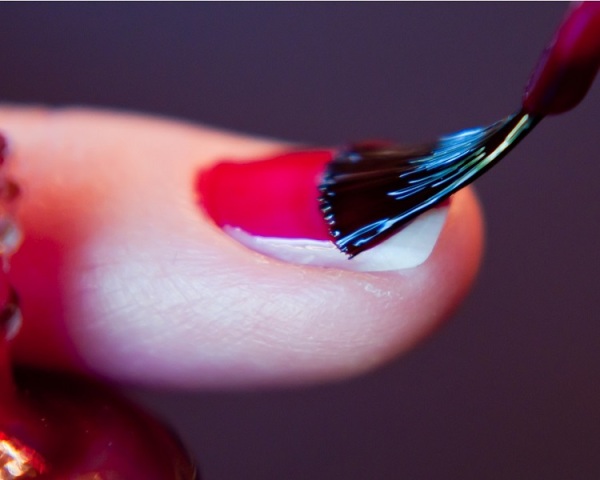
Image: jronaldlee@flickr
Homemade Nail Polish Recipe
Recipe 1
Materials Required
- Clear Nail Polish
- Colored Eye Shadow/ Pigment Makeup
- Nail Polish Remover
- Fine Glitter Dust (optional)
- Small Funnel
- Scrap of Paper
- Plastic Baggie
Procedure
- Open up the bottle of clear nail polish and place the funnel end into the bottle.
- Block the hole of the funnel by placing a small scrap of paper at the bottom.
- Place some eye shadow in a sealed plastic bag. Gently press the eye shadow and crush it till you get a lump-free, powdery consistency.
- Transfer the powdered eye shadow or pigment makeup into the funnel.
- If you desire, you can add a very small amount of fine glitter to the funnel mixture.
- Carefully mix the fine glitter and eye shadow/ pigment makeup before you remove the scrap of paper.
- Remove the scrap of paper and allow the mixture to enter the bottle.
- Remove the funnel from the bottle and replace the cap on the clear nail polish.
- Shake the bottle well for about 2 minutes.
- You can add more eye shadow/ pigment makeup or glitter in case the resultant color is not up to your liking.
- In case your nail polish gets thick or lumpy, add a few drops of nail polish remover and shake for one minute to thin the nail polish.
Recipe 2
Materials Required
- Cold pressed Olive Oil
- Powdered White Clay/ Kaolin Clay
- Henna Powder (optional)
- Cotton Swabs
- Soft Cotton Cloth
Procedure
- Combine together 1 tablespoon of cold pressed olive oil with ½ tablespoon of powdered white clay/ kaolin clay. Mix well till you get a smooth paste. While the olive oil will moisturize your nails and cuticles, the clay will buff and shine the surface.
- Add about ½ tablespoon of henna powder to the nail polish to add color to the nail polish. Since henna is natural, it will bring out a soft and natural color to your nails.
- You will have to add a little more olive oil to the paste in case you are using henna powder.
- With the help of an old nail polish brush or cotton swab, apply the polish to your nails. Make sure that you do not get the henna on your skin else it will get tinted. Wipe away any splashes with a damp cloth.
- If your nail polish does not include henna, leave it on your nails for about 15 minutes.
- In case you have included henna, moisture the nail polish by dipping a cotton swab in warm water and dabbing the surface of the paste.
- Leave the henna on for at least 1 hour depending upon how deep you want the color.
- Wipe off the paste gently with a cotton cloth dipped in warm water.
- Use the paste on the cloth to massage your nails in circular motion. This will buff the surface giving your nails a great shine.
- Remove any excess paste by wiping it off with a clean cotton cloth.
How to Cite


See also
- Blackheads | Blonde Hair | Body Care | Collectibles | Curly Hairstyles | Dandruff | Dry Hair | Dry Skin | Embroidery | Emo Hairstyles
More from iloveindia.com
- Home Remedies | Ayurveda | Vastu | Yoga | Feng Shui | Tattoos | Fitness | Garden | Nutrition | Parenting | Bikes | Cars | Baby Care | Indian Weddings | Festivals | Party ideas | Horoscope 2015 | Pets | Finance | Figures of Speech | Hotels in India : Delhi | Hyderabad | Chennai | Mumbai | Kolkata | Bangalore | Ahmedabad | Jaipur
- Contact Us Careers Disclaimer Privacy Policy Advertise With Us Lifestyle Sitemap Copyright iloveindia.com. All Rights Reserved.