Making a handmade fabric headband is a fairly simple task, which involves hardly a few minutes of your time. Read on to explore instructions on how to make cloth headbands.
How To Make Cloth Headbands
Headbands are one of the most popular hair accessories for women of every age group. Right from the 1-year old baby girl to the 25-year old career woman, it adorns the head of one and all. A popular fashion statement, the use of headbands has been seen in different civilizations and throughout the ages. The ancient Greeks and Romans used this piece of headwear while attending special occasions and for important events. In the present times, apart from being used as an ornament, headbands are also used by athletes during physical activity, to absorb heat and keep the heat from entering their eyes. Special types of headbands are used to protect and cover the ears from extreme environmental conditions as well, like snow, wind etc.
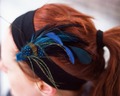
Image: Stacie Stacie Stacie@flickr
There are wide varieties of headbands available in the market - knitted, crocheted, beaded, and so on. Many people prefer the toothed headbands as well, which ensure that the hair stays in place. Such a hair band gives people a sleek look and can be used by either of the sexes. Festive hair bands are also available like reindeer ears, Santa Claus hats and so on, during occasions like Christmas and New Year. However, the most favorite as well as the most comfortable amongst them is the cloth headband. The best part of a cloth or fabric headband is that it can be easily made at home as well. If you don't believe us, go through the lines below. We have provided simple instructions on how to make cloth headbands.
Making Handmade Fabric Headband
Things Needed
- Elastic
- Fabric
- Thread
- Sewing Machine
Instructions
- Measure the circumference of your head with a measuring tape and cut a piece of elastic, of exactly the same size.
- Place a strip of fabric on the sewing machine, about 1/2" inch in width and approximately 2" longer than the elastic.
- Lay the elastic, you had cut in the first step, on top of the fabric and stitch both of them together, to the end. Make sure that you get a neat and fine stitch to avoid any shabby look.
- Fold the side edge of the fabric 1/4", then over onto the elastic.
- The next step would be to fold the opposite side over 1/4", then over onto the elastic and the fabric.
- Now, sew down the middle. Make sure that you stretch out the elastic, from both the ends, while stitching. This is very essential to hold the elastic in place and avoid its coming out.
- When you have completely stitched together the elastic and the fabric, remove the headband from under foot and clip threads.
- Stitch the two ends of the headband, with the right sides together. Now, back stitch and stitch again.
- Finally, remove the headband from under the sewing needle and clip the seam closely. Iron your headband to smoothen any creases and folds.
- Your cloth headband is ready to be worn!
How to Cite


See also
More from iloveindia.com
- Home Remedies | Ayurveda | Vastu | Yoga | Feng Shui | Tattoos | Fitness | Garden | Nutrition | Parenting | Bikes | Cars | Baby Care | Indian Weddings | Festivals | Party ideas | Horoscope 2015 | Pets | Finance | Figures of Speech | Hotels in India : Delhi | Hyderabad | Chennai | Mumbai | Kolkata | Bangalore | Ahmedabad | Jaipur
- Contact Us Careers Disclaimer Privacy Policy Advertise With Us Lifestyle Sitemap Copyright iloveindia.com. All Rights Reserved.