A chignon hairstyle is easy to make and looks perfect for almost any and every occasion. Go through this article and explore instructions on how to pin a chignon.
How To Pin A Chignon
Tired of sporting the same hairstyle at all the parties? Want to try something different? What about a chignon? One of the popular updo hairstyles in the present times, it basically comprises of a bun, but with a number of variations. Easy to do and great to look at, it surely is gaining increasing popularity with the passing time. The best part is that it can be worn by women with any length of hair, the only exception being very short. At the same time, it helps shows off your slender neck and shoulders as well as the studded earrings or necklace that you are wearing. Want to explore more? Go through the following lines and know how to pin a chignon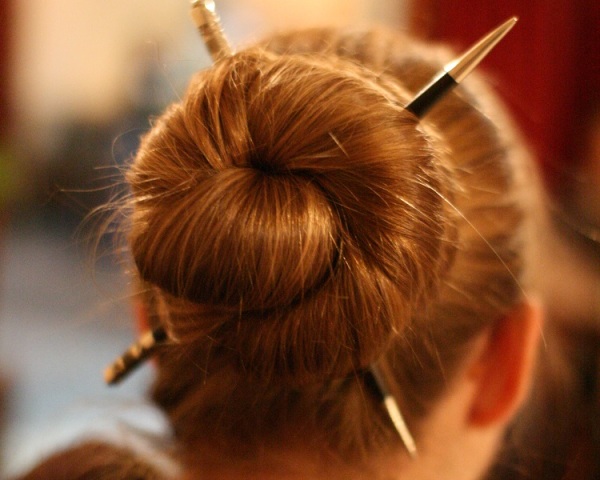
Image: pterjan@flickr
How To Make A Chignon Hairstyle
Supplies Needed
- 2 Coated Hair-bands
- Bobby or Chignon Hair Pins
- Hair Texturizer (gel, mousse, thickening spray or pomade)
- Hair Spray
- Decorative Hair Accessories (jeweled pins or flowers)
Instructions
- The day before you plan to make a chignon, give your hair a thorough wash. While the wash will ensure that your hair is clean enough for the hairstyle, the one-day gap will allow the oils on your scalp time to gather and travel down the hair shaft, as you brush your hair, making it smoother, shinier, and more pliable.
- As the first step towards pinning a chignon, you will have to gather your hair and tie it into a low ponytail, at the base of your neck. For the purpose, you can either part your hair (in the middle or at the side) or simple brush it straight back. Remember, stiffer hair will give your chignon a formal look, while loose hair around the face will make it look casual.
- Next, you need to secure the ponytail with a coated hair-band. Following this, texturize your hair, especially if it is too thin or fine, using hair wax, pomade, gel, mousse, thickening spray or regular hair spray for the purpose. This will allow the hair to hold the shape properly and help your chignon have a greater volume.
- In this step, you will have to twist the hair in your ponytail. You can either twist the hair as a whole i.e. in a single section or divide it into separate section and then wrap them around each other (in a spiral). Yet another option would be to braid the ponytail, but only if the braid is long enough to coil around the base of the ponytail at least twice. Now, secure the end of the twisted/ braided hair with another coated hair-band.
- Now, start coiling the twisted/ braided ponytail around the base of the ponytail. As soon as the ponytail makes one complete circle around the base, use pins to attach it to the back of your head. Make sure to use enough of pins, so that the chignon stays put, and does not sag, even after you have worn it for a couple of hours.
- Continue with the coiling procedure till the time you come to the end of the twisted/ braided ponytail. Make sure to pin the hair in place, as you go about doing the coiling.
- Your chignon is almost complete. All you have to do now is tuck the end of the twisted/ braided ponytail under the chignon. You can tuck it under the outermost coil of hair, pulling it through in such a way that the hair at the end stick out. You can then fan out the ends to add some more style to the chignon hairstyle. You can use gel or pomade to make the ends stand.
- Your chignon is ready! Use some hair spray, to keep it in place, and then decorate it with a few flowers or jeweled pins, placed in the outermost coil. In case you are using decorative pins, place them in such a way that they catch light and sparkle well. In case you want to soften the look a bit, try pulling some tendrils of hair around your face.
How to Cite


See also
More from iloveindia.com
- Home Remedies | Ayurveda | Vastu | Yoga | Feng Shui | Tattoos | Fitness | Garden | Nutrition | Parenting | Bikes | Cars | Baby Care | Indian Weddings | Festivals | Party ideas | Horoscope 2015 | Pets | Finance | Figures of Speech | Hotels in India : Delhi | Hyderabad | Chennai | Mumbai | Kolkata | Bangalore | Ahmedabad | Jaipur
- Contact Us Careers Disclaimer Privacy Policy Advertise With Us Lifestyle Sitemap Copyright iloveindia.com. All Rights Reserved.